TouchCast Studio: How to Stream a Live TouchCast
Step-by-step Guide on How to Live Stream a TouchCast
Streaming a TouchCast within Studio is only available for customers with a Business or Enterprise agreement.
1.Create a new TouchCast and tap the "Live" feature on the bottom left corner once you are inside the project.
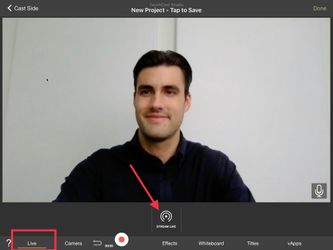
2.You will see a "Stream Live" option popup on the center of the toolbar, tap this option and you will be taken into the stream interface, but the streaming won't begin yet.

3. You will now see a circle on the bottom of the page where the record button usually lives. This is the Stream button. Tap on the Stream button to begin broadcasting (however, before you begin your stream, we recommend configuring the live stream settings).
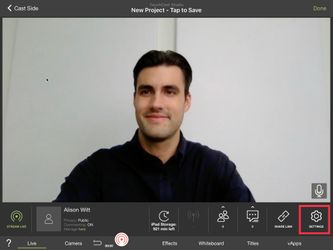
4. To configure the stream, tap on the settings option on the far right bottom corner of the dock.

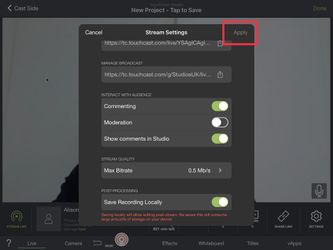
4. Once you tap the settings icon, a popup with configuration settings will appear. From this menu you can name your stream (this is required before you can apply the changes), hashtag it, create a unique password (or generate your own), alter the Bitrate (or quality of the stream - make sure you have a strong connection if you want it to be higher quality), save the recording locally once you finish the stream, allow for commenting and or moderation, show the comments or disable comments from showing as the stream progresses, share links to the stream and the manage page. Just remember to always tap "Apply" on the top right hand corner of the page to save any changes that you make.
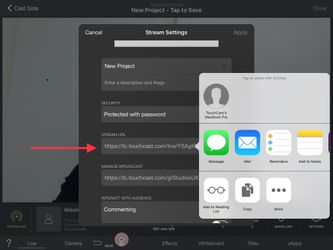
5. To manage the stream from another device, simply copy the manage broadcast URL into another browser. It's made easy by tapping the small share button to the right of the link and sending it to another device via Airdrop, text, and e-mail. You may also simply copy and paste it wherever you wish. For more info on managing a stream, skip to step 8.
To share your stream with your viewers, copy the stream URL and share via email or alternative messaging. Viewers will follow this URL on their device (using a modern browser). Please note if you have protected your stream with a password, the viewer will need to enter this code to watch.
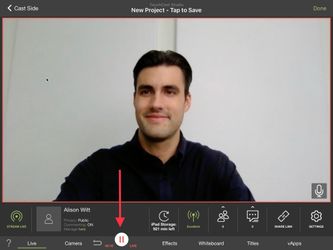
6. Once you're ready to stream, just tap the live red record icon at the bottom of the screen. This process may take 10 to 30 seconds to appear to your viewers depending on the speed of your internet connection (all broadcasts have a delay like this).
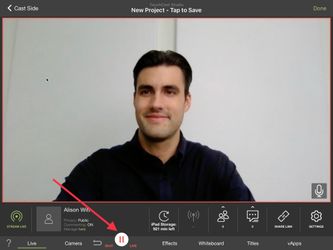
7. Once the stream is live, you'll notice some changes in the UI. A red frame engulfs the camera feed. A Pause button replaces the Stream button. A timer shows the duration of the stream (as well as a "Live" marker). As people enter or leave messages you'll see the respective number go up under each icon in the doc. You can also see the strength of the internet connection.
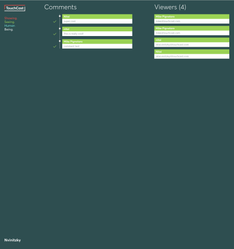
8. As mentioned in step 5 you may manage the commenting for the stream from another browser if you wish. In this view you'll need to login with the same credentials you logged into TouchCast Studio. Once you've logged in, you'll see columns for comments and viewers. This view makes it easier for you to see comments and moderate them as they come in (if moderation is turned ON). This is a great way to see all of the comments posted during the entire stream (Studio only displays the latest for a brief period).
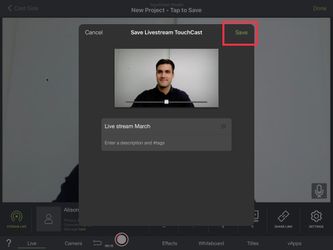
9. Once you're finished your broadcast, tap the live stream pause button and then tap Done. This will end the live stream. Then save your performance by naming the video and providing a description. Once you've finished adding these fields, just tap Save to export your TouchCast. Congratulations! You've successfully live streamed your very first TouchCast and have the recording to prove it!
Related articles