TouchCast Pitch MacOS: Record vs Present
When you're finished with preparing your scenes, you'll be given two options; Record and Present. Record Mode is for recording your presentation to share with your audience later, while Present Mode is for presenting in real time. The following article explains the differences between the two.
Record Option
When you select to advance to Pitch Mode, a pop up window opens for you to select which Pitch Mode option you would like to follow. Click the Record option.
If you discover that you aren’t ready to record, or would prefer the Present option, click on the Prepare Mode button to return to preparation activities.
Remember, all recorded clips, created using either option, are placed into the Clip Tray.
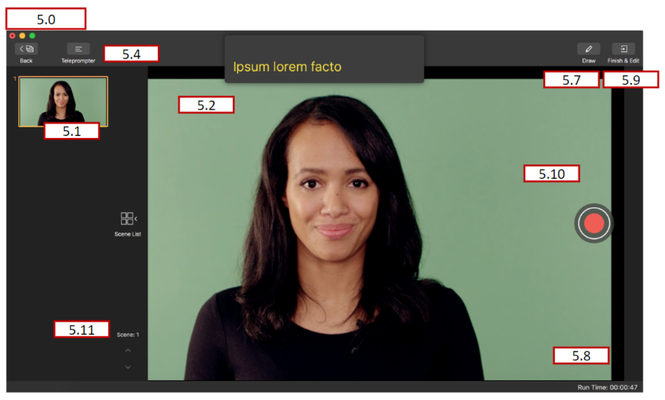
5.1 Scene List and Scene List Display Control
The Scene List displays the scenes created during Prepare mode as thumbnails along the left hand side of the Pitch screen.
The Scene List Display Control is used to display (expand) or hide (contract) the Scene List. If the Scene List is already displayed, clicking on the control causes the Scene List to contract out of view. If the Scene List is contracted, clicking on the control causes the Scene list to expand.
Example of contracted Scene List:
5.2 Selected Scene
What appears in this area is what is being recorded (or will be recorded).
5.3 Intentionally Left Blank
5.4 Teleprompter Control
The Teleprompter Control allows the presenter to display the teleprompter script as scenes are recorded. The default setting is On.
The teleprompter script appears as semi-transparent text because it is not displayed in the presentation (it is not recorded as a layer of the recorded presentation.) If the script is longer than what can display in a few lines, the text will scroll through the display field.
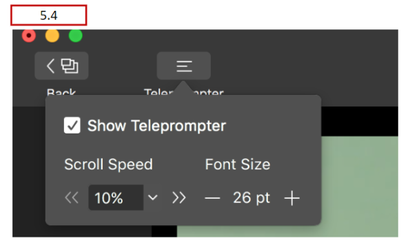
5.4.1 Teleprompter Scroll Speed
If the script is longer than what can display in a few lines, the text will scroll through the display field. The speed at which the Teleprompter Script scrolls is controlled by the setting of the Scroll Speed control. A scroll setting of 100% is an average reading speed. The speed can be reduced by clicking the down arrow or by clicking the << or >> icons located at either side of the speed display.
Clicking the << (minus) icon decreases the scroll speed 10%
Clicking the >> (plus) icon increases the scroll speed 10%
5.4.2 Teleprompter Font Size Control
The font which the Teleprompter Script displays is controlled by the setting of the Font Size control. The default font size is 18 point.
Clicking the ‘-’ icon decreases the font 1 size
Clicking the ‘+’ icon increases the font 1 size
5.7 Draw Control
The Draw control is used by the presenter to add illustrations to a scene using the cursor as their drawing tool. These drawings can be placed on the scene while recording is active or can be placed when the recording is paused so that the illustrations will already be in place when recording is resumed.
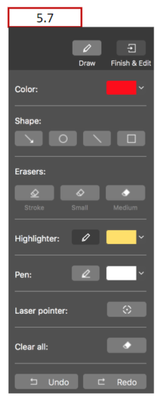
There are seven Draw Control options available:
5.7.1 Shape
Select the shape of the object, (e.g., rectangle, circle, line, arrow) to be placed on the scene.
5.7.2 Erasers
Removes specific illustrations (lines) or all drawings from the scene. Clicking on the eraser icon turns the cursor into an eraser which removes any drawing it passes over. Clicking the arrow immediately below the tip of the eraser icon opens a window to select the option erase all drawings on the scene (just the currently selected scene).
Clicking the main Draw Control icon again, reverts the cursor back to its normal function.
5.7.3 Highlighter
Draws a bold semi-transparent line. The color of the highlighter icon indicates the color which will be used for new illustrations. Clicking the arrow immediately below the tip of the highlighter icon opens a pallet where the illustration color can be selected from 6 color options and line size is selected using a slider control.
After the color and size are selected, the cursor is used to draw on the scene.
Clicking the main Draw Control icon again, reverts the cursor back to its normal function.
5.7.4 Pen
Draws a bolder (more dense) line than the Highlighter. The color of the pen icon indicates the color which will be used for new illustrations. Clicking the arrow immediately below the tip of the pen icon opens a pallet where the illustration color can be selected from 30 color options and line width is selected using a slider control.
After the color and size are selected, the cursor is used to draw on the scene.
Clicking the main Draw Control icon again, reverts the cursor back to its normal function.
5.7.5 Laser Pointer
Draws a simulated ‘laser pointer’ line with the cursor.
Clicking the main Draw Control icon again, reverts the cursor back to its normal function.
5.7.6 Clear All
Clears all drawing object from the scene.
5.7.7 Undo / Redo
Click the Undo and Redo options to remove/restore the last drawing object changes made to the scene.
5.8 Run Time Clock
The Run Time clock displays the length of time the scene has been recording in hh:mm:ss. The time indicated is the time since recording began last and is not necessary elapsed recording time because the timer starts over each time the record is started or resumed.
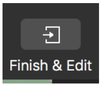
5.9 Finish Button
The Finish Button is clicked when the author has completed recording all scenes (with possible multiple takes for scenes) and is ready to begin editing the presentation.
5.10 Record/Pause Toggle
The large red Record / Pause button controls when video is being recorded to the Pitch presentation. When recording, the Pause button (three vertical lines icon) displays. When paused, the Record button is displayed.
5.10.1 Record Countdown
When the Rec (record) control is selected, prior to capture starting, a Countdown Animation displays showing the countdown from 5 seconds (the default delay) to when zero is reached and the recording actually begins and the Recording Control panel is displayed. During the countdown, the Recording Controls panel is displayed, but all options on the Recording Controls panel are inactive. During the countdown, the presenter can tap the Countdown Animation to stop the countdown (cancel starting to record) and return to the Screen Capture Setup Panel. If the recording is cancelled and the presenter returns to Setup Panel, all selected settings will appear as they had been set.
5.11 Scene Advance
The Scene Advance control is used to move (advance) through the scenes in the Scene List as they are recorded. Clicking on the upper arrow (up arrow ^) returns to the last scene in the scene list. Clicking on the lower arrow (next arrow v) advances to the next scene in the scene list. The current scene number is displayed above the arrows.
Note: The same function can be performed by selecting scenes from the scene list, but you may want to collapse the scene list making the Scene Advance the only option.

Present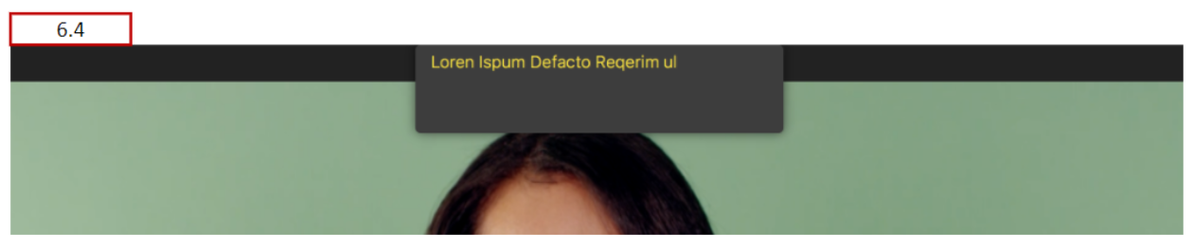 Option
In the Present option, the default is for scenes to display without controls showing. This is done to support ‘‘live’ presentations where the audience is viewing your device screen.
To provide the presenter basic controls, Present uses three special features:
- Clicking the Escape key (esc) ends recording (if active) and returns the presenter to Prepare Mode
- The Up and Down arrow keys can be used to advance through the scene list (even if the list is not currently displayed)
- Moving the cursor temporarily opens an Option Window
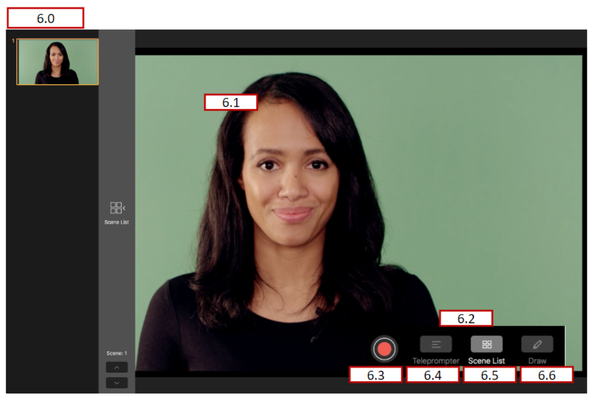
6.1 Selected Scene
What appears in this area is what is being presented or recorded (or will be recorded).
6.2 Floating Option Window
In Present Mode the default is for scenes to display without any Pitch controls showing. This is done to support ‘live’ presentations where the audience is viewing your device screen. To allow the presenter to perform necessary functions such as controlling the teleprompter, an Option Window appears temporarily when the cursor is moved. After a few moments, the window closes.
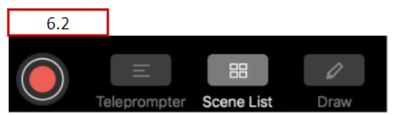
6.3 Record Button
The large red Record / Pause button controls when video is being recorded to the Pitch presentation. When recording, the Pause button (three vertical lines icon) displays. When paused, the Record button is displayed.
6.3.1 Record Countdown
When the Rec (record) control is selected, prior to capture starting, a Countdown Animation displays showing the countdown from 5 seconds (the default delay) to when zero is reached and the recording actually begins and the Recording Control panel is displayed. During the countdown, the Recording Controls panel is displayed, but all options on the Recording Controls panel are inactive. During the countdown, the presenter can tap the Countdown Animation to stop the countdown (cancel starting to record) and return to the Screen Capture Setup Panel. If the recording is cancelled and the presenter returns to Setup Panel, all selected settings will appear as they had been set.
6.4 Teleprompter Control
Clicking the Teleprompter option opens the teleprompter script window at the top of the Scene. The presenter and others viewing the device screen will see the teleprompter script but it is not recorded in the video clip. Clicking the Teleprompter option when it is active closes the teleprompter script window.
Present Mode does not provide teleprompter controls available in Record Mode (e.g., script font size and scroll speed). You can however, turn them on under settings if you wish to have those controls. They are disabled by default since the user is assumed to want as much screen real estate as possible. 
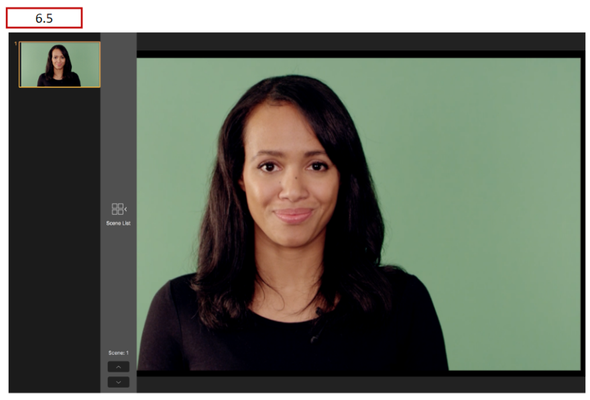
6.5 Scene List Control
Clicking the Scene List icon opens the Scene List on the left side of the Present Screen. Clicking the Scene List icon when the Scene List is open hides the Scene List.
6.6 Draw Control
The Draw control is used by the presenter to add illustrations to a scene using the cursor as their drawing tool. These drawings can be placed on the scene while recording is active or can be placed when the recording is paused so that the illustrations will already be in place when recording is resumed.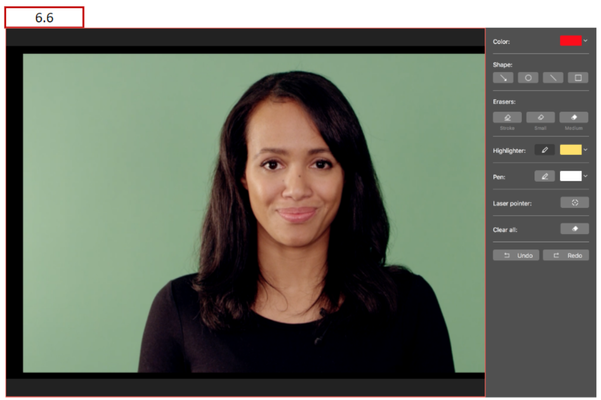
The Draw Control functions in Present Mode are identical to those used Record Mode.