TouchCast Studio: Record Screen Features
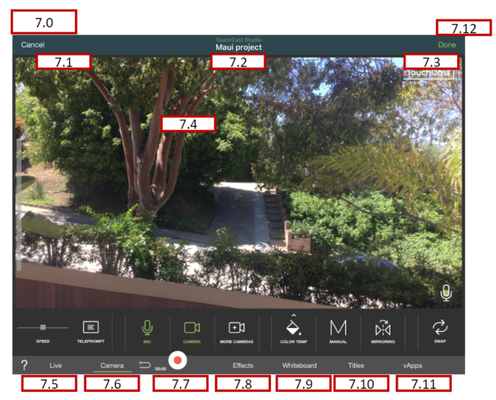
In addition to the question mark icon (?) which you can tap to view Coachmarks, the Studio Record Screen contains these options:
Tip: The options located across the bottom of the record screen (Live, Camera, etc.) when activated, display a sub-menu of options and controls unique to that option. Always check to see which option is active (underlined) to understand which sub-menu is currently displaying.
7.1 Cast Side / Cancel Button
Depending on what you are currently doing, the Cast Side or Cancel button will be located in the upper left corner of the Record screen.
- Cast Side - You want to take a break from working on your project. Tap the Cast Side button and Studio prompts you to Save the project or discard it. Either way, you will return to the New TouchCast screen.
- Cancel - You are changing your project (e.g., adding a new scene) but changed your mind. Tap the Cancel button to discontinue. You will be prompted to save or discard any changes you have made.
7.2 Project Name
This area displays the project name. If you have not saved the project yet, the name defaults to New Project. Otherwise, the name you assigned when you last saved the project will display.
Tap this area to initially save your project and assign it a name or to save your project and optionally revise its name.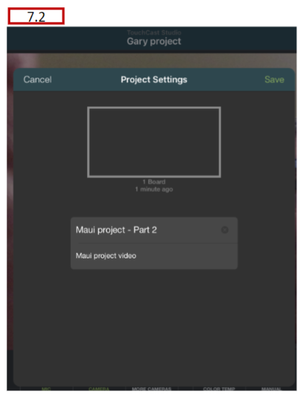
7.3 Done Button
Tap the Done button when you have completed recording your touchcast and are ready to begin editing your clips. If you select this option but have not recorded any clips yet, Studio will advise you of this and provide button to return to the Record screen and continue there.
7.4 Scene Display Area
The Scene Display contains what is being recorded (or will be recorded).
Tip: The Watermark (upper right corner by default) displayed on the scene area can be removed, relocated or changed to some other logo using the Effects → Watermark options if the user is licensing the paid version of the application.
7.5 Live
The Live menu option is used to create a Live Stream video of an event. The camera feed is shared with others who you have shared the link with (and optionally the password).
An example of a Live Stream:
Suppose you want to create a Live Stream video of an important live announcement to be made at 12:00 pm today. You would like to allow others located in another city view the announcement ‘live’ on their tablet device and record the announcement so others can view it later.
- Prior to the event, you would alert others that you intend to broadcast a Live Stream.
- Just before the announcement, you would create the Studio Live Stream project and send the link to your intended audience.
- At 12:00, you would begin broadcasting your Live Stream. As you record, you can monitor viewer comments.
- You selected to record the stream locally (a settings option) so post-broadcast you edit the recorded video and make the presentation available to others who could not watch the Live Stream broadcast.
For more information about live streaming see: TouchCast Studio: How to Stream a Live TouchCast and TouchCast Studio: Live Streaming Menu
7.6 Camera / Mic / Teleprompter Settings
Tap the Camera menu button to expose controls for your Camera, Microphone, and Teleprompter.
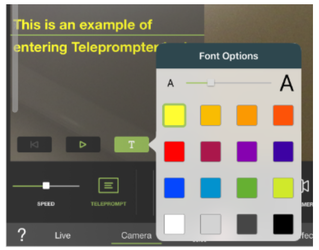
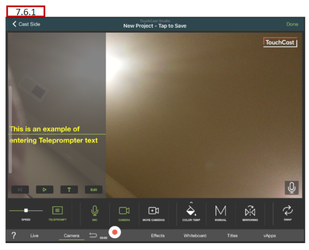
7.6.1 Teleprompter Controls
The Teleprompter script allows you to capture notes, script and other information associated with a scene so that it can be referred to when that scene of the presentation is being recorded. Teleprompter script does not appear in the recorded video clip.
When you tap the Teleprompter icon, the current script appears in a transparent area on the left portion of the record screen.
- Tap the back arrow to back up through the script
- Tap the forward arrow to move forward through the script
- Tap the T icon control the font size and color of the text
- Tap the Edit button to revise the script
More on using the Teleprompter feature:
- Use Teleprompter speed control (slider control) to adjust the rate at which text scrolls.
- Once opened, the Teleprompter script display remains visible (to you) as you select other menu options (e.g., Effects, Whiteboard, etc).
- To close the Teleprompter script display, tap the Teleprompter icon again. The script will remain for use later.
- You can develop a new Teleprompter script for each scene prior to recording it as a clip.
- A best practice is to break script into shorter paragraphs to make it easier to follow as you present. Also, Teleprompter Script should be written as if you were talking, not as a formal document. This way it sounds natural to your audience.
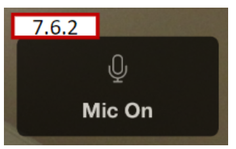
7.6.2 Microphone On/Off Control
The Microphone control turns the device microphone on or off. An icon displays momentarily indicating the state of the microphone each time you tap the control.
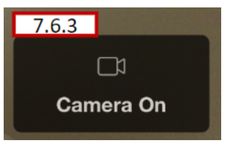
7.6.3 Camera On/Off Control
The Camera control turns the device camera on or off. An icon displays momentarily indicating the state of the camera each time you tap the control.
7.6.4 More Cameras
The More Camera function is used to install the TouchCast External Camera app. This app will automatically pair with Studio when both are running on the same network.
The Preview and Output feeds are displayed on the screen along with a slider control to check the volume of the selected camera. 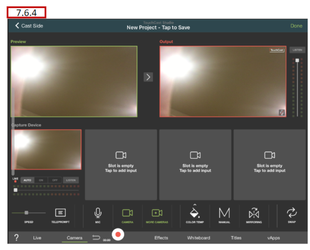
If multiple cameras have been defined, the following ‘swap’ icon will be active. Tap on it to swap to the next camera.

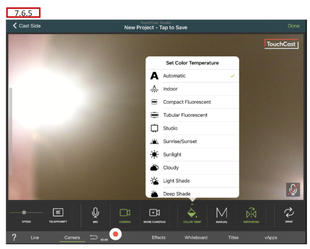
7.6.5 Color Temp Control
The Color Temp control is used to adjust the camera to optimize for a specific lighting situation. When you tap this control, a list of Color Temperature options opens. Select the setting which best matches your recording location.
- Automatic (default)
- Indoor
- Compact Fluorescent
- Tubular Fluorescent
- Studio
- Sunrise/Sunset
- Sunlight
- Cloudy
- Light Shade
- Deep Shade
7.6.7 Image Mirror Control
The Mirroring function is used to automatically reverse the recording image (left - right perspective), enabling text to be recorded so that it appears correctly to the viewer. To disable the function, tap the control again.
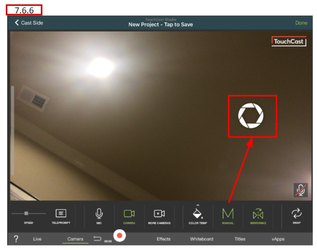
7.6.6 Manual Focus and Exposure Control
The Manual function is used to set the camera focus and exposure based on a specific location you select on the scene. This is primarily used if the lighting is uneven or you want a clearer focus on your subject other than surrounding objects.
When you tap the control, an icon similar to a lens appears on the screen. Move the icon over the specific area you want to base exposure and focus on, then tap the icon to apply and save that position to the shot.
7.6.7 Image Mirror Control
The Mirroring function is used to automatically reverse the recording image (left - right perspective), enabling text to be recorded so that it appears correctly to the viewer. To disable the function, tap the control again.

7.6.8 Swap Cameras
The Swap Cameras function is used to swap between cameras if multiple cameras have been installed. If the device has a front and rear camera, you can swap between them using this control.

7.7 Record/ Pause Toggle
The large red on white Record / Pause button controls when video is being recorded. When recording, the Pause button (three vertical lines icon) displays. When paused, the Record button is displayed.
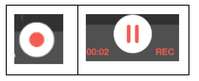
When recording, the recording elapsed time and the text REC appear in red below the button.
Each sequence your record (Tap the record button then tap it again to pause recording) creates a new clip in the Clip Tray (covered in Edit functions).
7.7.1 Record Countdown
When the record control is selected, prior to capture starting, a Countdown Animation displays showing the countdown from 5 seconds (the default delay) to when zero is reached and the recording actually begins. During the countdown, you can tap the Countdown Animation to stop the countdown (cancel starting to record) and return to the pre-record setup process.
The Countdown function can be disabled by setting the Setting option ‘Countdown before Record’ off (the default setting is on). The Studio Settings are explained in section 5.8.2 of this guide.
7.8 Effects
The Effects menu options provides features for enhancing the appearance and sound of your presentations, including:
- Filter the camera feed
- Alignment guidelines
- Green Screen tools
- Watermark
- Sound Effects
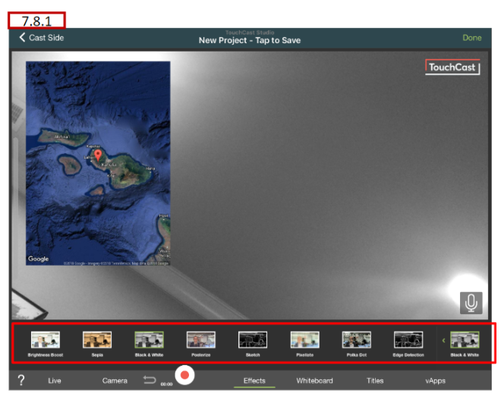
7.8.1 Filter
The Filter option is used to modify the camera feed appearance. When you tap the control, a horizontal scrollable list of different filters appears, including:
- No Filter (default)
- Sepia
- Black & White
- Sketch
- Polka Dot
- Others
The current filter option displays to the right of the selections area. Tap one of the filter selections to apply it to the scene. To close the Filter control, tap the current filter setting.
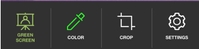
7.8.3 Green Screen
The Green Screen option activates additional tools for controlling green screen appearance of the camera feed.
- Color - Select a background color for removal
- Crop - Select an area to perform the background color removal (the default is the entire camera feed area).
- Settings - Adjust the background color removal for smoothness and sensitivity, control Degreen, and control virtual background stabilization.
- Background photo or video
Tap the Green Screen icon to activate the options and again to turn this feature off.
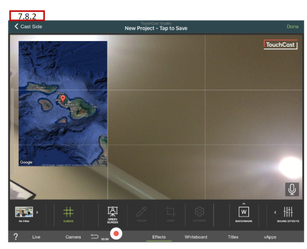
7.8.2 Guides
The Guides option is used display a pattern of grid lines on the screen to help you align objects. The lines do not appear in the recorded presentation.he camera feed.
Tap the Guides icon (#) to turn on the grid lines and again to turn this feature off.
7.8.3 Green Screen
The Green Screen option activates additional tools for controlling green screen appearance of the camera feed.
- Color - Select a background color for removal
- Crop - Select an area to perform the background color removal (the default is the entire camera feed area).
- Settings - Adjust the background color removal for smoothness and sensitivity, control Degreen, and control virtual background stabilization.
- Background photo or video
Tap the Green Screen icon to activate the options and again to turn this feature off.
Two other Effects controls you should be aware of are the background selection buttons located on the right side of the screen when Effects → Greenscreen are active. You can select photos or videos as the new background.
In the example a background from the TouchCast Stock images is selected to be used as the background.
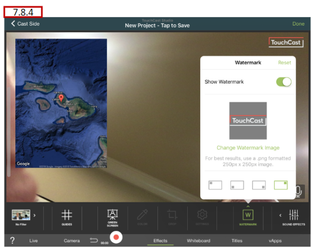
7.8.4 Watermark
The Watermark option is used to remove, relocate or change the semi-transparent logo which appears on the screen.
Tap the Watermark icon to open the watermark window and again to close the window.
7.8.5 Sound Effects
The Sound Effects option is used add pre-recorded sound effects to your scenes. You can select from a collection of sounds including:
- Laughter
- Applause
- Crashing
- Ohhhs
- Ahhhs
- Sad
- Happy
Or, import a sound effect clip from your device or another source.
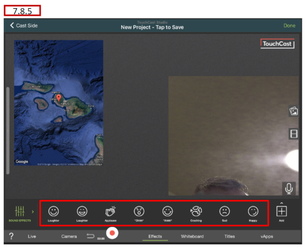
Tap the Sound Effects icon again to close the option.
7.9 White Board
The White Board menu options provides features for enhancing your presentations by incorporating pre-prepared drawings or drawing ‘on the fly’.
- Recalling saved whiteboard drawings
- Save and clear the whiteboard at any time
- Drawing surface
- Drawing tool/color/width of strokes
- Undoing strokes
- Exporting drawings as a vApp
The following is a whiteboard example using a white surface with typed text:
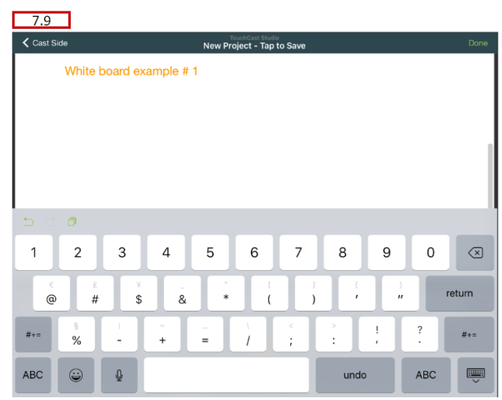
Other surfaces are available and the illustrations can be drawn as well as typed. Below is additional Whiteboard options you will use.
7.9.1 Saved Boards
The Saved Boards option is used to recall a whiteboard drawing you created and saved previously. Drawings can be deleted from the ‘saved’ list using the Edit option.
7.9.2 Save & Clear Board
The Clear & Save Board option is used to save the contents of the whiteboard so it can be recalled later and clear the board to begin a new drawing.
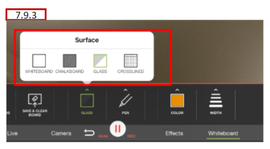
7.9.3 Surface of the Board
The Surface of the board you would like to draw on can be selected from a pop up window which opens when you tap on this control. The surface options are:
- Whiteboard (default) - White surface covering entire screen
- Chalkboard - Dark grey surface covering entire screen
- Glass - Transparent surface covering entire screen
- Crosslines - Add cross lines to the surface
The current surface selection will display as the icon for the control.
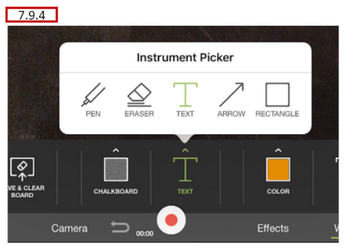
7.9.4 Drawing Instrument or Shape
The Instrument or Shape you would like to draw with is selected from a popup. The currently selection will display as the icon for the control.
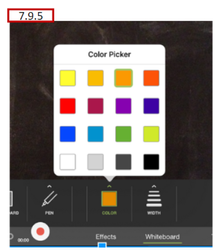
7.9.5 Stroke/Text Color
The Stroke/Text Color you would like to draw with can be selected from a pop up window which opens when you tap this control. The color options displayed as a palette.
The current color selection will display as the icon for the control.
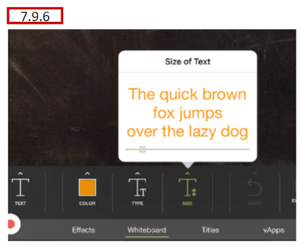
7.9.6 Size of Text
The Text Size you would like to use if Text is the current instrument selection. The size is selected using a slider control in the popup window.
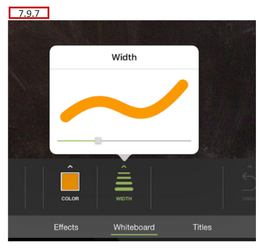
7.9.7 Stroke Width
The Width of the stroke you would like to draw with can be selected from a pop up window which opens when you tap on this control. The width is selected using a slider control.
7.9.8 Eraser Width
The Width of the eraser you would like to use if the Eraser is selected.
7.9.9 Undo
The Undo option is used to remove the last stroke added to the drawing.
7.9.10 Export Drawing as a vApp
The Export Drawing as a vApp function is used to save the drawing as a vApp which can be used on other presentations.
7.10 Titles
The Titles menu options provides a collection of presentation titles you can add to your presentation scenes. Text fields on the titles can be customized to fit your topic.
7.10.1 New Title
The New Title option is used to place a banner at the bottom of the scene. When you tap the New Title icon, a window listing over 20 title templates displays.
7.10.2 Time Out
The Time Out setting is used to set the title to disappear after a set length of time into the recording.

The Time Out interval will apply to all titles if a series of multiple titles is used. (see Next Title option). |
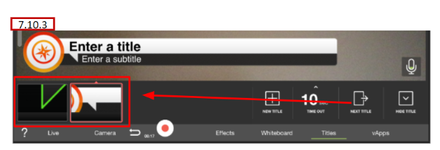
7.10.3 Next Title
The Next Title option is used if you want to display a series of titles during your presentation. The titles you select display in a tray and each time you tap Next Title, the next title in the series displays. This option is disabled if only one title has been selected.
7.10.4 Hide Title
The Hide Title option is used to end the display of the current title. This option is disabled if no title is being displayed.
7.10.5 Remove Title
To remove a title from a scene, tap and hold the thumbnail of the title you wish to remove until the trash can icon appear below the title tray. Drag the title to the trash can icon to remove it.
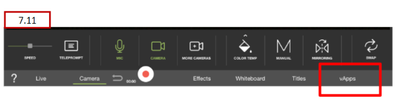
7.11 vApps
Section 6.3 of this guide provides a general explanation of vApps so only the basic steps of selecting a vApp will be presented in this section.
The options for adding a vApp to your presentation appear below:
When you tap this button, the Add vApp option ( + icon) displays.
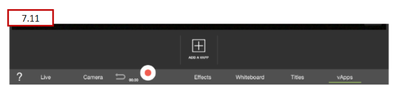
Tap that icon to open a screen of vApps you can use in your presentation.
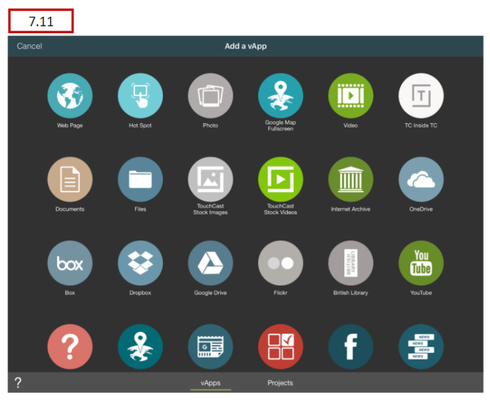

Select the vApp you like to include and a screen for entering information specific to that vApp will display. Some vApps have multiple ‘set up’ steps and which may include a ‘preview’ step (e.g., Lists, Polls, Quiz Questions).
When you have time, check out the variety of vApps available on the vApps page.
7.11.1 Removing vApps From Your Scenes
To remove a vApp from a scene (and remove it from the vapp tray), tap and hold the thumbnail of the vapp you wish to remove until the trash can icon appear below the title tray. Drag the title to the trash can icon to remove it.
7.11.2 Camera / Media Layout Positions
It's important to plan where your objects will appear on the scene. You will get familiar with the different patterns of Scene Layouts as you work with Studio, but here is a summary of common patterns.

7.12 Done
Tap the Done button located in the upper right corner of the Record screen when you have completed recording your clips and are ready to move on to the TouchCast Editor to finalize your presentation.
If during the Editing process you discover that you need to add or replace a segment of your presentation, no problem. You can select the Add Clip option of Edit which returns you to the Record screen.